I have both faith in you, and a plan B.
Plan B: A roll of velcro and a dream.
I have both faith in you, and a plan B.
Plan B: A roll of velcro and a dream.
Hi there.
Using the back expansion bay, could it be possible to create a battery extension for the laptop 16 ?
I tried to imagine one for the laptop 13 but the space constraints, ventilation grid and lack of a secure way to attach the module seems to render it not feasible in a perfectly harmonious way.
Damn. Well I may have a solution for you, if you’re willing to downsize your battery potentially. This is a prototype frame (in red) I’m playing with for an Expansion Bay swappable battery, I’ve 3d printed a couple test parts. This fits within the frame, as well as a 6.5-102-55 mm block dimension test for the battery, which could slide in and out of the cover on the back.
Rails can be made on this frame, the battery could connect to a port on the back of the frame (by the interposer), and I’ve been wondering how to make the battery pop in and out with a nice springy motion. The metal rails taper off, so there is a bit more space to the front/outer area of the frame to potentially mount the required electronics. The left side of the second picture shows what I’m talking about.
Do you have any solution for the electronics? I believe you’ll need to communicate with the EC about charging and decharging
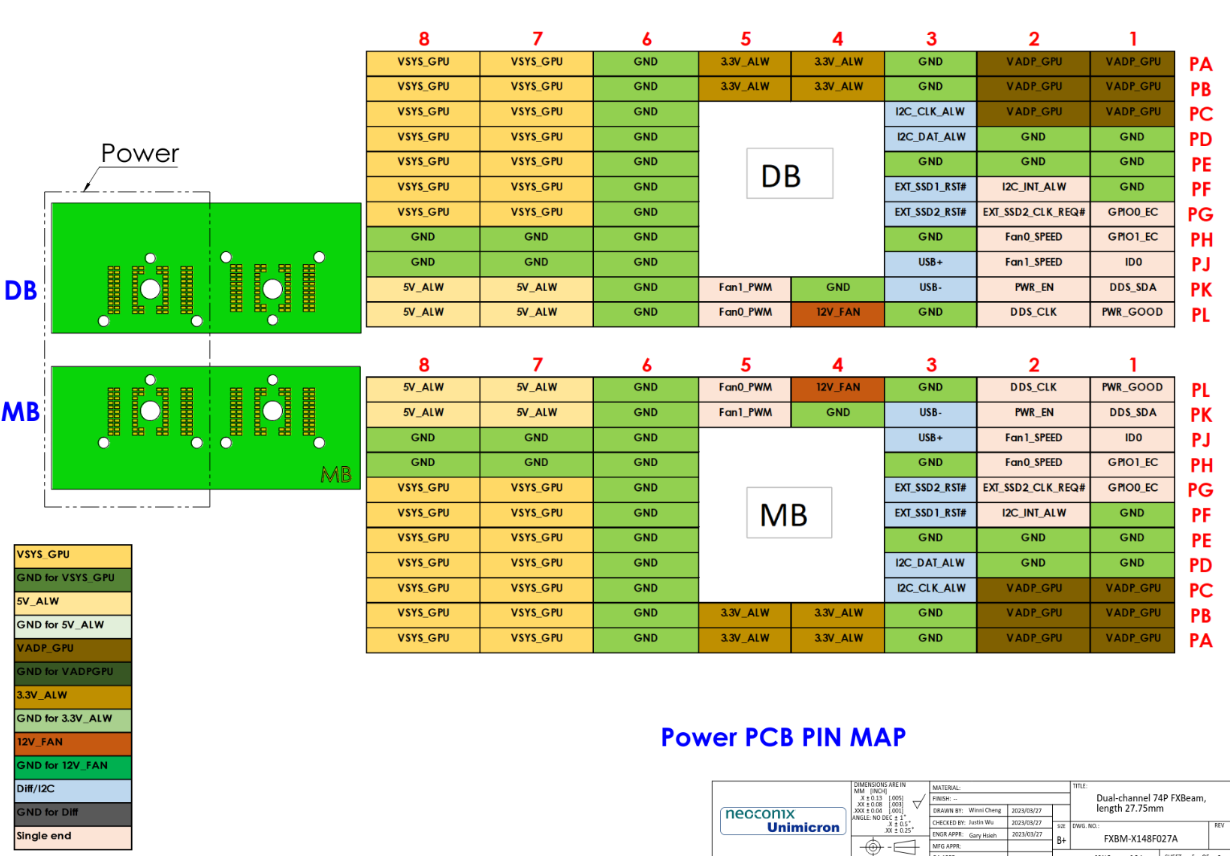
I currently don’t unfortunately. I know we’d need to connect to pins 41-46 for V_ADP_GPU for power as shown in Link 1 and the image. For the ground (GND_ADP_GPU) pins, I believe that’s 47-51. It’s also in the image’s legend as dark green, although the image doesn’t show it as dark green for some reason. I believe I could make a small connector that piggybacks off of the current interposer connection by sandwiching itself between the interposer and mainboard. An easier and more physically stable piggyback connection would be to connect to the 8 pins on the expansion bay itself that the interposer attaches to, but I can’t find any documentation as to what that pinout is.
From Link 2, the Expansion Bay Developer Program, Nirav shares part of the power map but mentioned that they haven’t defined the EC communication yet (Reply #16), so I’m not too sure where to go from there. I went ahead and asked, hopefully I can learn more!
Link 1: ExpansionBay/Electrical/Dual-channel 74P FXBeam, length 27.75mm _Rev 2_(Public version).pdf at main · FrameworkComputer/ExpansionBay · GitHub
Link 2: Expansion Bay Developer Program - #16 by nrp
Hi,
I wanted to share some of my ideas for your problem — maybe they can help you.
Each battery pack would need both a charger and a Battery Management System (BMS). These can be connected to the I²C lines. As far as I understand from the FW16 schematic, pins C3 and D3 are connected to the EC. That would require custom firmware on the EC.
In my opinion, the labeling of the I²C lines is really weird — it took me quite some time to figure out where they are connected. You can find them in the GPU section of the schematic.
Here are some parts for exempel:
Those two are for max 4s packs
The Power Architecture
As far as I understand it, you can only discharge over VADP and charge only over VSYS_GPU.
In the schematic on page 10, there’s a power overview. In the VADP power path, there’s a switch — presumably it’s controlled by the EC, although I’m not entirely sure. It might also be drawn there to imply that it should be implemented in the battery pack itself.
Best Regards
Hey! Thanks for the reply.
Just to confirm my noob understanding: For C3 and D3 you’re saying that I2C_CLK_ALW AND I2C_DAT_ALW are I2C lines we can connect to for the BMS and Charger, and the main power of the battery would still connect to V_ADP and V_SYS. Power would flow from the laptop to the battery through V_SYS, then the Charger, then Protection FET / Battery / BMS. Then the EC communicates to the BMS and Charger, and charge flows from battery to V_ADP. Correct?
Also, I’m wondering how to safely test to see what the pinout for the 8 pin expansion bay connector is, as well as if we can use that for a battery connection. It seems like a simpler and easier connection, does anyone think we can use it?
Same with the actual battery itself. If we were able to connect power from the extra battery to the connector where the main battery slots into, would that be safe and just act as an additional charge reservoir for the main battery?
Just want to drop a warning, if you mean just connecting a 2nd battery directly in parallel with the main battery, that can go very badly.
Outside of a situation such as here with a laptop battery, parallel li-ions are sometimes done. But carefully, with balanced cells of the same capacity, cell wear and age, and critically, the exact same voltage when connection is made. Plus a BMS meant for keeping cells in balance or at least individual li-ion protection chips for each cell would be needed in my opinion. Li-ion fires can be really nasty, producing toxic fumes and hard to extinguish.