DIY Staggered Columnar Laptop Keyboard (Semi Ortholinear) [Prototype]

Hi @dosssman
Thanks heaps for the detailed reply.

I’m still loving what you are doing, and you are inspiring me to try and get an idea together around a custom input cover

Haven’t got my thoughts together fully, buti will reach out through the contract form and see if they will be forthcoming with CAD dukes of the input cover …

1 Like

Thanks for the suggestion. I actually have another Ergo keyboard that has more key than I would like, and the idea would apply nicely to there too.
Will try to 3D print a few covers once I manage to rework the input cover, in any case.

Sorry for the late answer, and thanks for the kind words. Looking forward to what you come up with.
I am torn between lazyness and “business” so I did not really give much thought to other aspect of the input cover, but there is definitely some ideas to work on.

1 Like

Greetings everyone.
My apologies for not posting much updates in the last weeks. Life indeed got in the way.

A quick update on the project: while in the previous update I could confirm that using copper tape and thin vinyl sheets would work as a custom keyboard matrix, it did not pan out as expect.

After disassembling the keyboard / input cover (graciously provided by the Framework Team! Much appreciated.) it turned out that the holes in the scissor switches where the bottom part of the keyboard’s aluminium hooks hold are very thin. Therefore, 3D printed a base where the FW keyboard switches can be installed did not look possible. Nevertheless, after experimenting a bit, the idea is to cut out the aluminium parts with hooks that holds the switches and graft them on a vinyl A4 sheet holder to serve as an alternative base following the desired layout.
Cutting out the switch bases takes quite some time and care as the aluminium plate is relatively fragile, but once that is done, it is straightforward to rearrange them into any layout (as in the video at the bottom, I have a few of those stuck on some A4 sheet with a test layout). Double sided tape is used to hold them down in place.

The second challenge was to assemble the DIY keyboard matrix made of thin vinyl sheet and copper tape with the key switches mounted on top. With the previous keyboard matrix prototype, mounting the key switch with the rubber membrane pressing on the vinyl sheets would essentially short circuit the whole matrix, so it was no key stroke would register. In simpler words, it could not be reliably used for typing.
After further refining the process, namely by halving the width of the tape and working out a better alignment of the latter, it finally ended up more or less working… Only been trying with one switch so far, as doing it for more would require being very meticulous.

Next step is probably to try and make it work with a few more switches, for example 2 col and 4 rows, and figure out the best method to make a matrix circuit that is compatible with the key switches. Then I am thinking of doing one half of the keyboard and play around a little bit with the EC firmware. After that, probably start to work on a replacement for the input cover grid (need to not only accommodate for the custom layout, but also make sure that the “keyboard” part can be screwed into the top input cover). Finally, once the full layout is done and can be connected to the EF, probably flesh out the firmware.

12 Likes

I was shared this project below. Perhaps you may know it. you may get some ideas from the project!

Introducing ThinKeys. The first split ortholinear laptop keyboard with a pointing stick. - https://modulo.industries/

5 Likes

The Charybdis looks like a pretty cool board, I particularly like how the otherwise wasted volume that is inherent to a 3d keyboard is taken advantage of to house a trackball.

The challenge with a laptop unit is of course, having mastered a 3D board, to constrain the design within only two dimensions.

1 Like

Greetings everyone.
My apologies for the late update.

In the light of the awesome announcements from the 2023 Framework Event, I fell compelled to at least give an update on this project, especially given the announcement regarding a potential QMK compatible ortholinear keyboard for the FW16 (???).

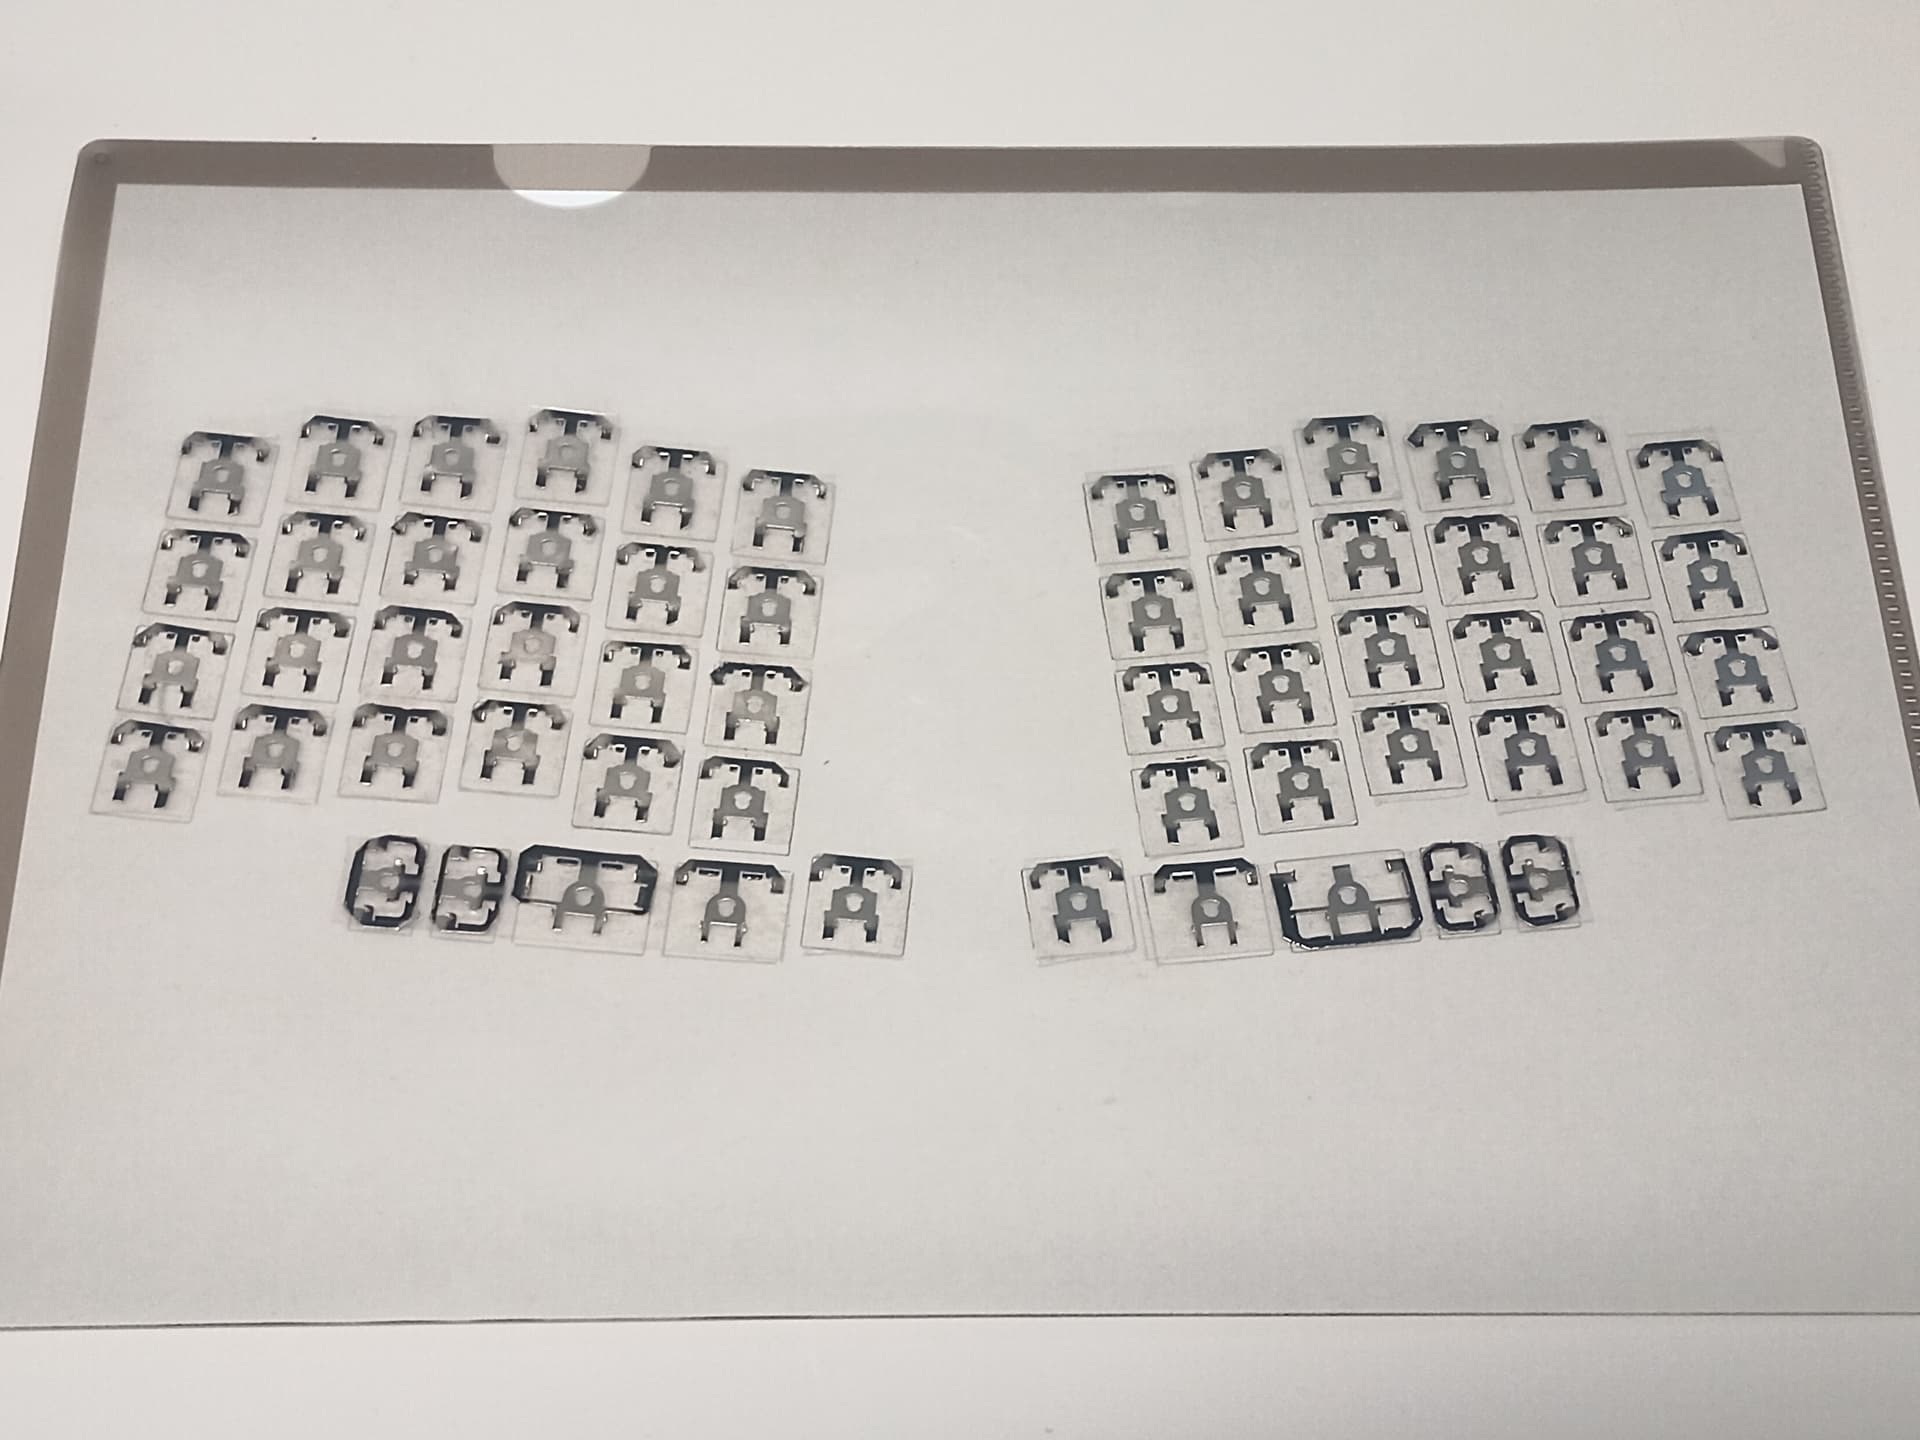
So far, the idea of this project was to cut out the grid from an original FW laptop’s input cover, re-arrange them to a desirable layout, while design the matrix keyboard using vinyl sheets and copper foil tape.

Cutting out the aluminium frame with the hooks that hold the butterfly switches required a great deal of patience and care:


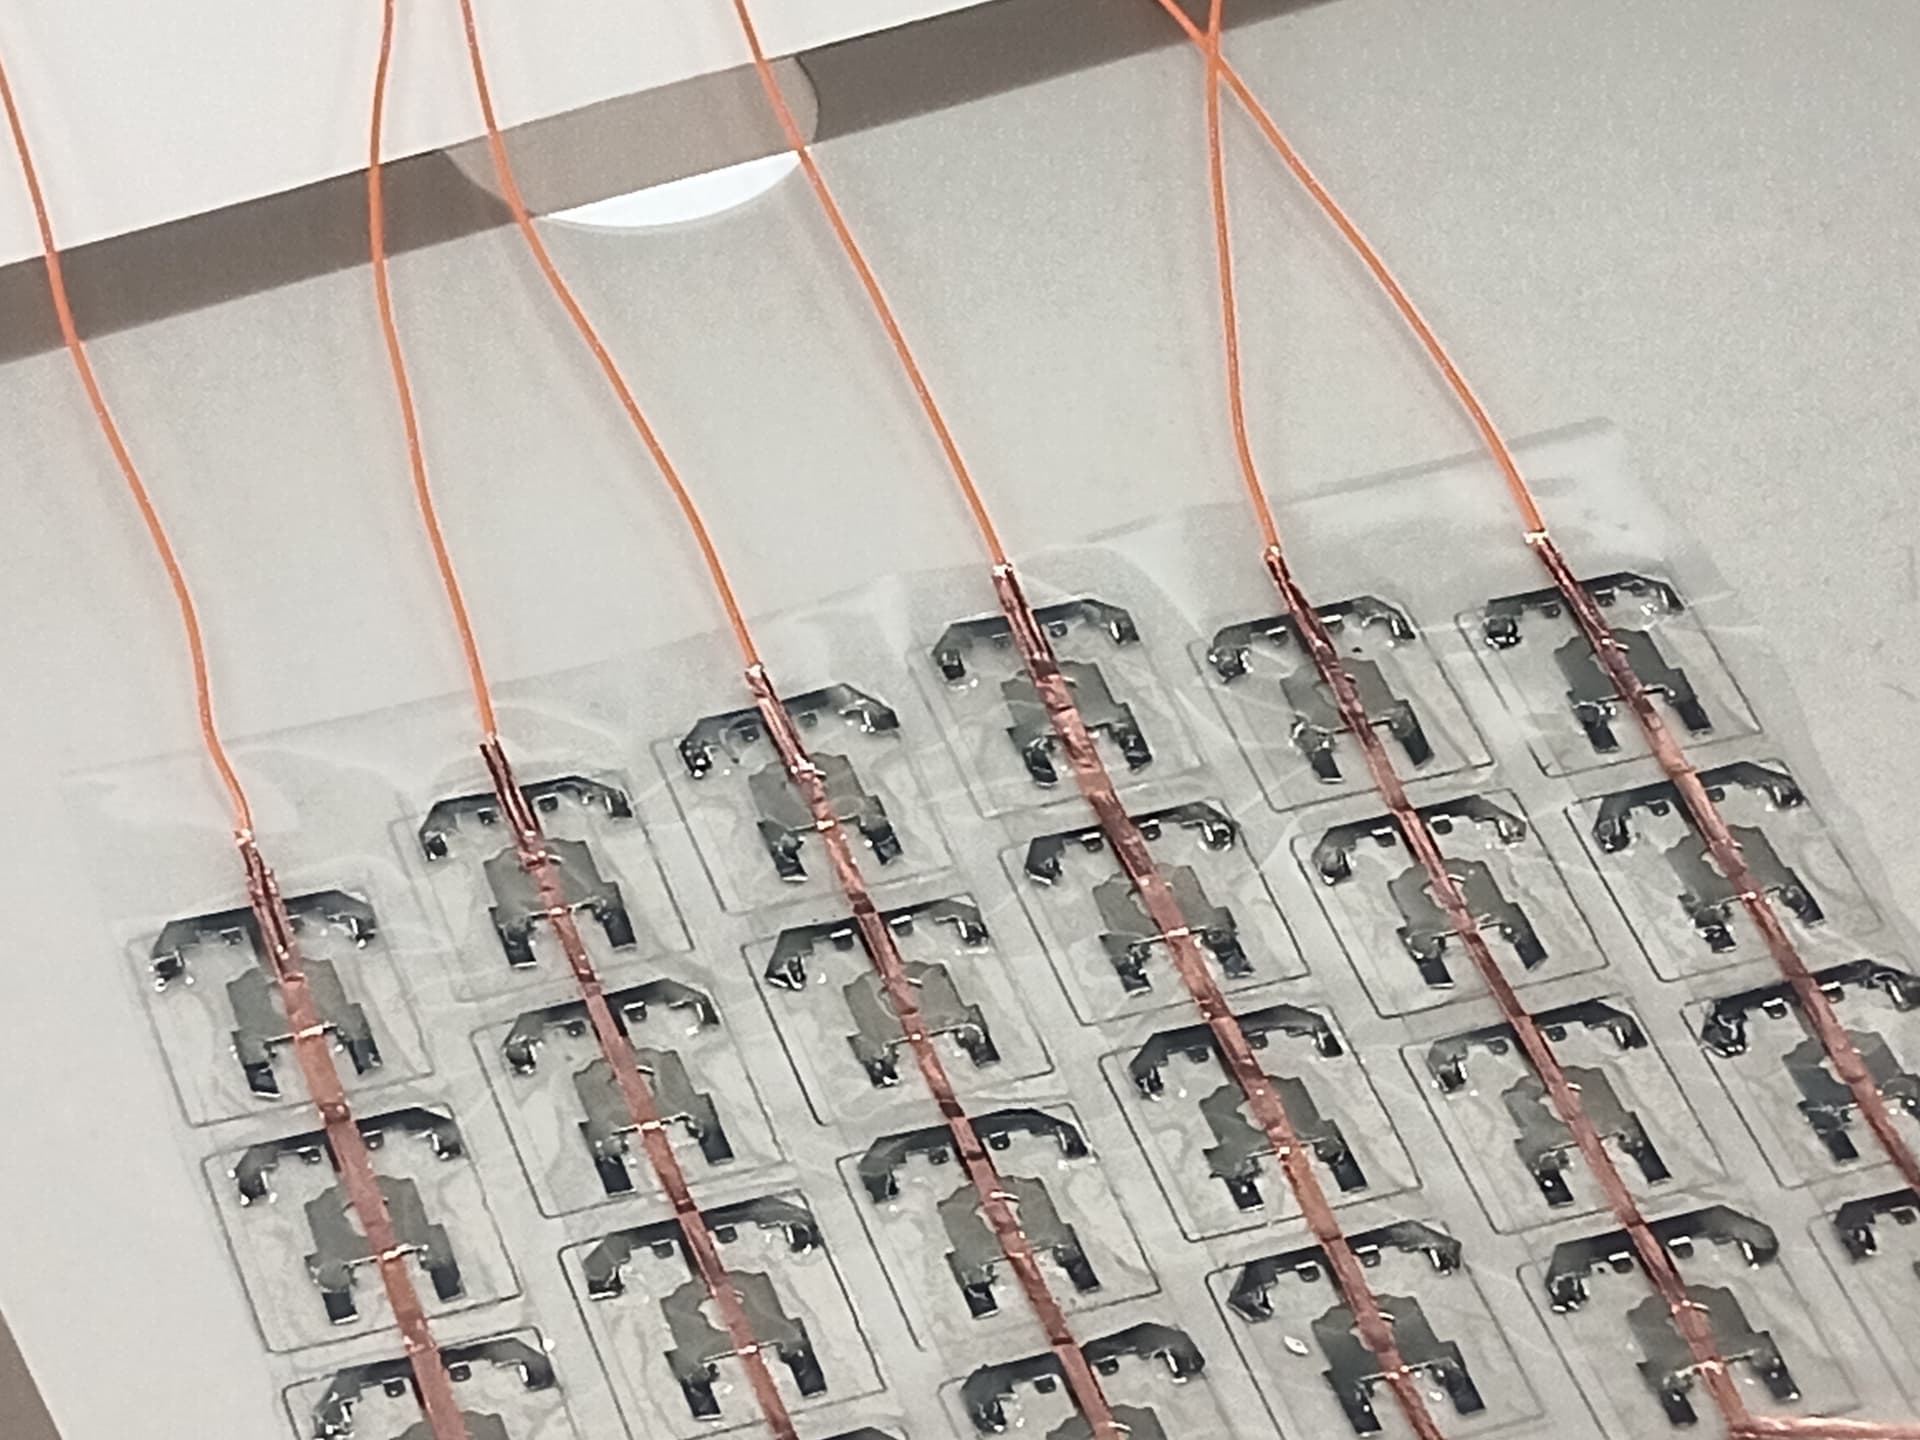
The next step was to cutout the vinyl sheets to match the shape of the keyboard, and lay the copper foil to form the matrix, with wires coming out to be connect to an Elite C.


Previously, I managed to get a small cluster of 2x4 keys working with the Elite C, but once scaled up, it turned out that the keyboard matrix was very unstable, hardly usable: some keys would behave as if always pressed, and the overall keyboard was very sensitive.
It seemed like it could hardly take some daily driving.

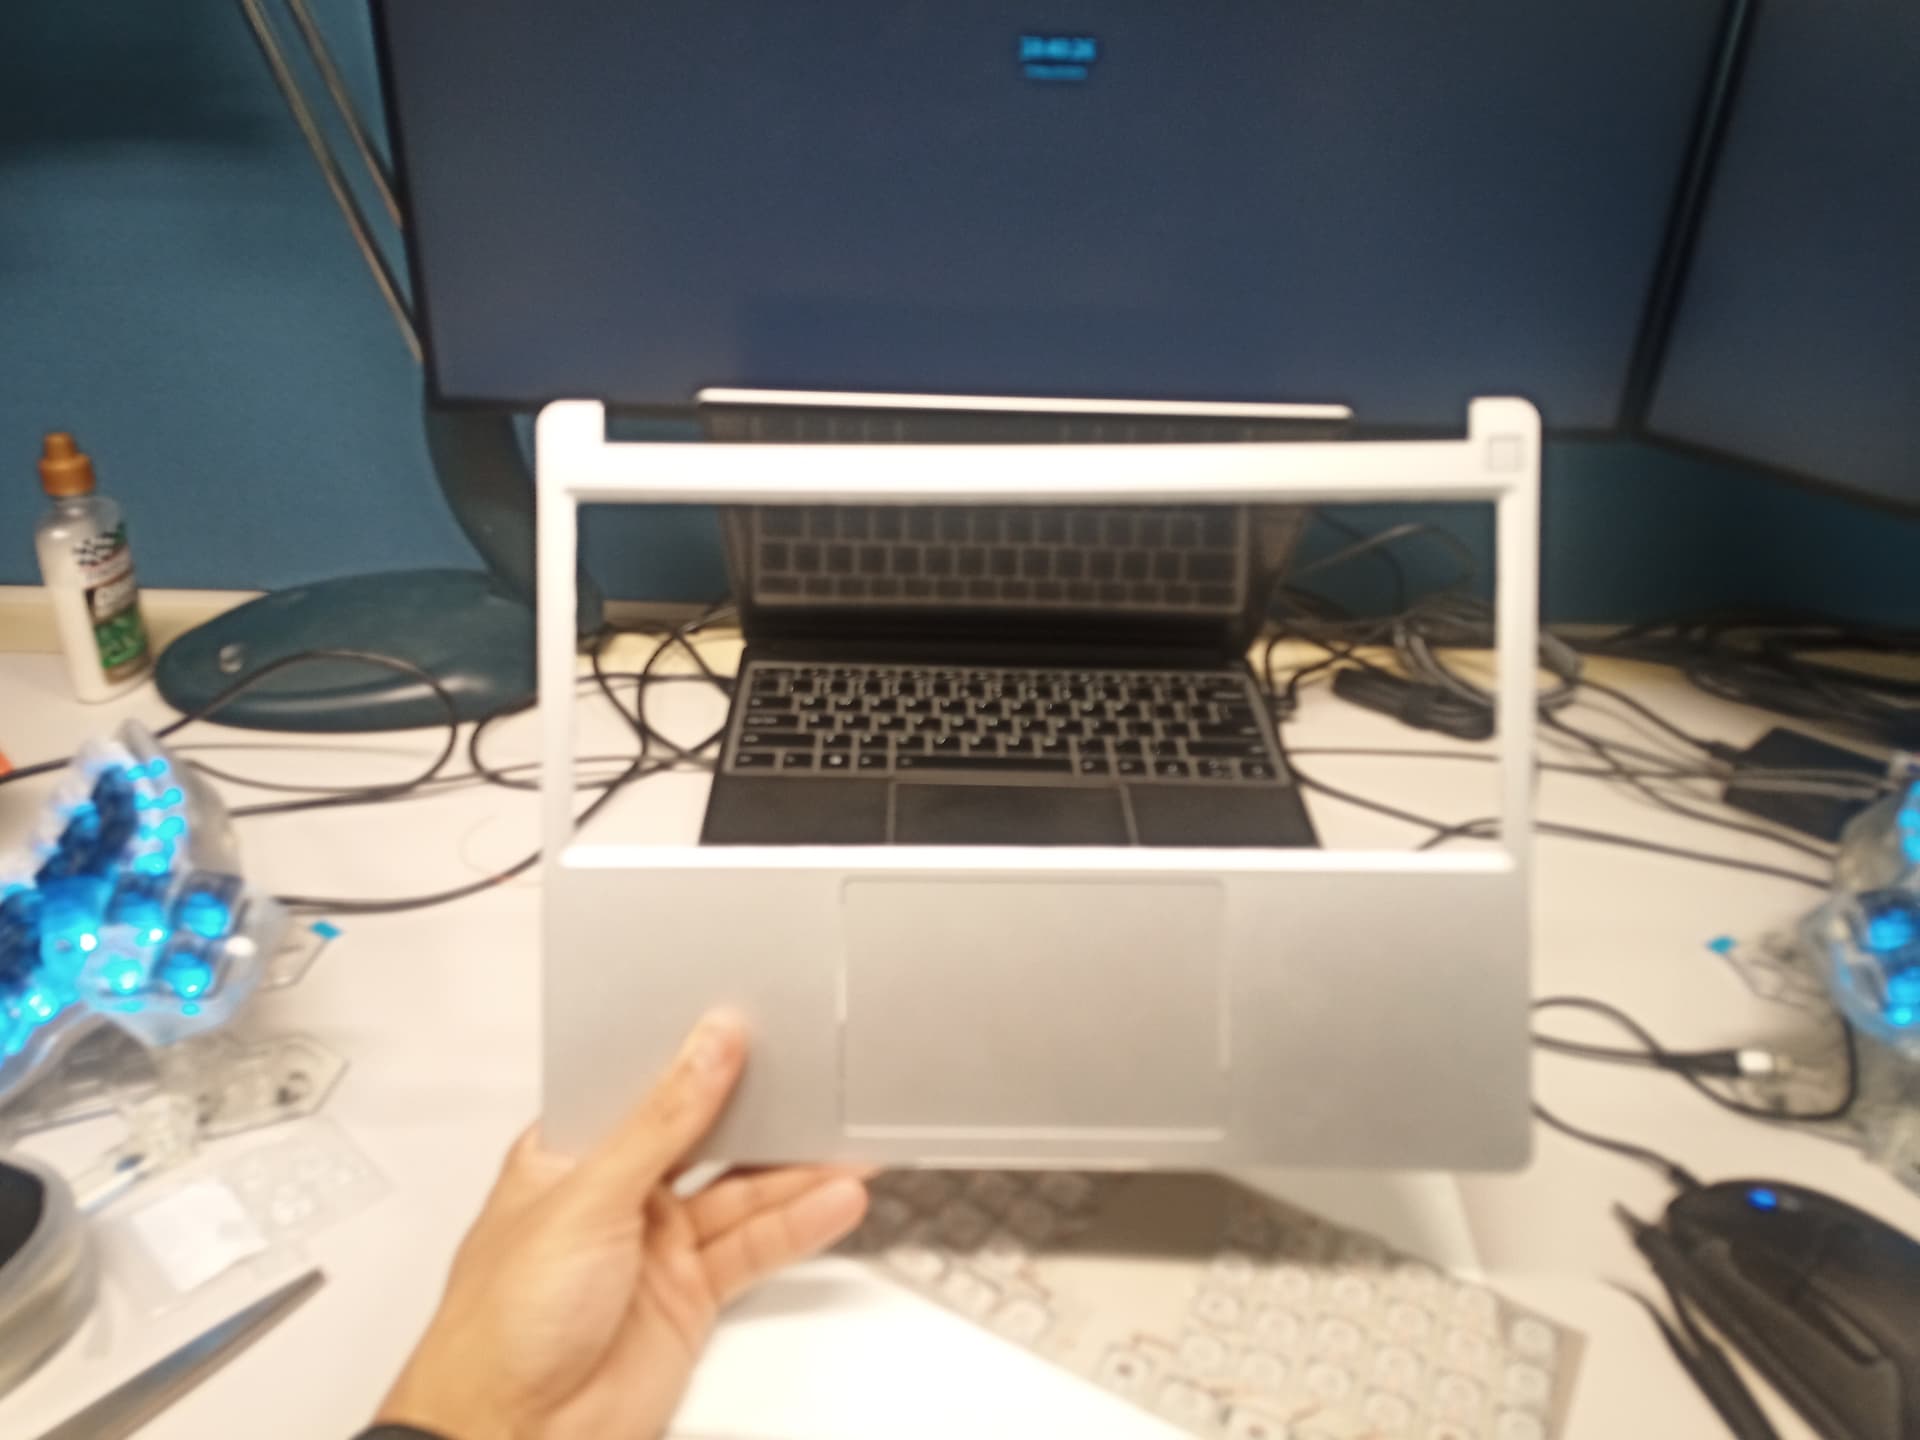
I had already cut the default grid of the input cover, 3D printed a clear grid with the desired columnar staggered layout to match with the custom grid.

The Elite C was to be mounted in the middle of the custom input cover, and a workaround to connect it to the input cover’s via the sensor print finger was essentially ready.
Unfortunately, the overall project has yet to pan out, as the keyboard itself was not stable for a good enough user experience.

Nevertheless, I would like to leave a few pics of the expected final product, as a proof of concept / source of inspiration for later, or an example of what could be :sweat_smile:

For now, I have been looking into other ways to make a reliable enough keyboard matrix for daily driving.
MX Cherry Ultra Low Profile sounds promising, but this will require a bit of work to wire around and design thin enough support plate / PCB while fitting within the 3.8 mm allowed by the FW 13’s chassis.

In the meantime, I am looking forward to see other projects or even official FW ortholinear input covers.

28 Likes

Awesome project !
I use a typematrix 2030 since +10y and I really love orthogonal keyboard.
The typematrix got the del and return keys in the middle of the layout. Because those keys are used so often, it’s logical to use the stronger finger, the index/pointer.
Anyway, your project makes me dream of an alternative keyboard layout for framework laptop… I’m going to follow closely. Thanks a lot.

3 Likes

This is the sort of keyboard layout I’ve been wanting so badly. I’m glad someone has had the courage to experiment on this front.

I want to give my thumbs and pinkies a bit more responsibility so I’d be aiming to integrate onto the FWL16 and either removing the trackpad entirely, or more likely surrounding it with keys either side, assuming I ever reach this point, and it’s possible to have input modules larger than large. :sweat_smile:

Excellent work so far, and thank you for sharing. I hope I may get to see it to it’s finale!

7 Likes

@dosssman we’re exploring a possible path to offering single-key modules that are mounted on thin PCBs, which are then soldered individually upwards into a PCB lattice that serves as both the electrical connection and the mechanical structure. Let us know if you think that would work for you.

25 Likes

@nrp Thank you very much for your answer, as well as supporting the project so far.

That would be incredible.If we can have a thin enough modular single switch like the 1U size keycap, then the PCB might be integrated into the input cover to maintain the low profile…
For custom layouts, it would definitely be easier to work on a PCB directly.
EDIT: I wonder how would the PCB be integrated to the input cover though.

Looking forward to updates on those modular single switches!

6 Likes

It‘s very nice to hear that message, but will it support zmk or qmk firmware? It is also very important feature for keyboard enthusiasts.

2 Likes

I think maybe it’s QMK, not ZMK.

Introducing the Framework Laptop 16

We’ve also released open source firmware based on QMK keyboard software that runs on the Raspberry Pi RP2040 microcontroller that many of our Input Modules utilize.

3 Likes

This would only be for the Framework Laptop 16. For Framework Laptop 13, it’s still the challenge that the Input Cover has specific hole placements in it.

4 Likes

Thanks for the precision. Hopefully with some thin enough single modular key switches that can be mounted upward, at least for this project I could work on a thin enough PCB that replaces the default grid of the input cover, with all the necessary traces for the keyboard matrix, making the overall solution more reliable than the current re-arranged membrane keyboard.

3 Likes

Getting QMK would be an epic milestone. ZMK will most likely come later naturally as adoption progresses right as itll gather more and more attention etc.

4 Likes

I’d expect QMK since they’re using it on most of the modules.

Why ZMK? I thought ZMK’s big advantage over QMK is Bluetooth support, which isn’t really needed for a laptop integrated keyboard… Does it have some additional compelling features beyond BT support? Is it easier to program or compile?

Seriously asking - I’ve a little experience with QMK but none with ZMK, so I don’t know the arguments one way or the other.

2 Likes

If the keyboard module had Bluetooth, it might be possible to pop out the keyboard, plug in a tiny battery, place the laptop on a stand, and end up with a much more ergonomic working position without needing to carry around a separate keyboard.

Though, this could possibly also be achieved by using the PCB as the male USB-C socket and just plugging it into the computer when using the keyboard externally.

3 Likes

Huh - hadn’t thought about a removable laptop keyboard; that’s an interesting idea… My personal preference is for a split ortho with the halves shoulder-width apart - laptop fits between them that way - but I suppose that would be possible this way too!

Yeah, interesting - thanks for the reply!

3 Likes

If you write the config yourself, you will find that ZMK has a much simpler syntax to achieve certain function. For example, combo is much easier to write in ZMK compared to QMK, because ZMK bind combo to key position, but QMK bind to key itself. So, if you have some modtap or layertap, you have to write the very long name every time you bind the combo. And to config the timeout for each combo, you have to write a function in QMK to return a timeout time, but in ZMK you just need to write a timeout-ms = which is more like a config and more convenient.

But if you use a GUI to set the key bindings, is not much different in term of functionality (ZMK has much more features, but generally, both functionality is enough for most users). And QMK has the ability for really time rebinding, so it is much easier for most users.

4 Likes

That’s really interesting - thanks for sharing some context.

I’m about to start a keyboard build - split ortho with some custom inputs - and I was looking at either QMK or KMK; I’d initially dismissed ZMK because I don’t need the BT support, but I’ll be sure to look at ZMK as well

2 Likes