I recently made a blog post about the modifications I’ve made to my framework, and thought I’d also post it here as y’all may be interested. As a result, some of the text may be worded weird, as it was a copy paste, but I didn’t want people to have to click to see it.
Original link: All my Framework 16 Mods
Integrated Mouse Pad

I’m a big fan of hybrid gaming. As a result, I like being able to grab my laptop off my desk mid-game and plop myself onto the couch to continue gaming. There are a lot of ways to do this, but I like to do it is by having a mouse pad integrated directly with the laptop because I find that keeps the whole process a little simpler and smoother. There’s nothing crazy here, I just cut and glued a mouse pad to size. Because this is a framework, I can also just swap out the spacer I glued the pad to if I decided I don’t want it on there anymore. Additionally, I also use a high-dpi mouse so my mouse doesn’t need to travel far for my needs. On low-dpi, I imagine this would be difficult to pull off.
More Storage
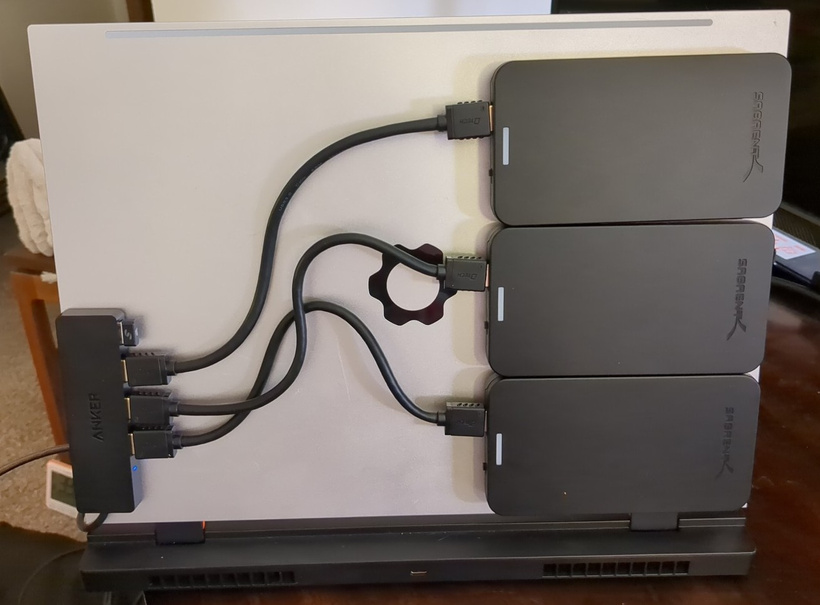
I don’t like running out of storage. I also don’t like paying hundreds of dollars for 1x extra large m.2 SSD. So, I added 12TB of storage by adhering some extra 4TB SATA SSD’s I had onto the back of my laptop’s display. Unfortunately, they draw more power during startup than the USB port can support. Fortunately, I can get around this by simply staggering their boot up… however in practice I really only ever need one at a time anyways, so it hasn’t been much of an issue.
Copper Shim Mod (CPU Temps)

For anyone who’s been active on the Framework forums, this mod is infamous. Essentially, there is an aluminum shim (rectangle) that sits between the heat sink’s vapor chamber and the actual CPU. This mod simple replaces that aluminum shim with a copper shim, which is much more thermally conductive. Before the mod, my CPU was hitting 100c and thermal throttling. After the mod, I have a difficult time getting it past 85c, and it’s normally sitting in the 70s under load. There’s a bit more detail and nuance that goes into this one, but it’s all well documented on the Framework thread. If there’s interest, I can make a separate post describing the process.
Additionally, I also repasted my dGPU module using LTT’s Honeywell phase change thermal pad, which drastically helped my dGPU’s hotspot temps.
Link to Framework forums thread (my username there is TechPriestNhyk): Uneven CPU thermals! - #1481 by TechPriestNhyk
Increasing Air Flow

After doing the copper shim, additional benchmark testing revealed that while it alone had helped my thermals, there was still more gains to be had. As it turned out, my device also wanted more airflow. So, I did what any reasonable dremel-owning individual would do: cut massive holes into my laptop for more air. Yes, this makes the device less visually appealing, and I will likely have to clean it more often, but the thermal gains I get from the modification are more than worth it for me. Eventually, I’d like to add some sort of trim to the rough metal edges so it looks a bit nicer… but that’s a problem for future me.
I also added a bunch of air-directing foam to the inside of the laptop so that the airflow would end up where it was most needed.
Custom RGB Keyboard Firmware

I’ve written a custom firmware for my RGB keyboard so that I can use it to display device performance stats that interest me:
Row 3 Tab → \: represents CPU utilization and temperature
Row 4 Caps Lock → Enter: represents RAM usage
Row 5 Shift → Shift: GPU power usage % and temperature
Row 6 Ctrl → Right arrow: represents battery usage (power draw while discharging, % charged while charging)
The F12 key (with framework logo) is used to show whether the dGPU is powered on or not. Red means it’s powered on, blue mean’s it’s in d3Cold. dGPU shouldn’t be on at the time I took that photo, so it’s already proving useful!
I also show whether wifi is connected and if the device is currently muted.
More information available on my FW forums post: RGB Keyboard Custom Firmware - PC Utilization Stats
Overriding PSU Safety Limits (Performance Stability)

Yes, you read that correctly. The Framework 16 has an “issue” where the device can pull more power than Framework’s 240W PSU can provide stock, leaving it up to the battery to pick up the slack. This is fine in short bursts, but over a long enough time period (25 minutes of Battlefield 6 in my case) it can drain the battery enough for the device’s control logic to trigger a recharge. This means the power-budget of the CPU/GPU is decreased in order to allocate some power to recharging the battery if there was no more juice left available from the power source. On it’s own, that might be fine. The performance loss due to that power budget change isn’t actually that crazy on it’s own and could easily go unnoticed. In my case however, it does become immediately apparent because the device will start flipping back and forth from the different power budgets about once a second. This results in a consistent 1s micro-stutter that destroys my 1% FPS lows, resulting in an actual headache if played long enough. As it turns out though, Framework’s control logic automatically throttles the PSU to just 90% of what it’s capable of. In the case of my 240W PSU, that throttle equates to ~205W, which when measured with an external power meter is exactly what I see the laptop pulling. Using a tool called ECTool I am able to override this 90% throttling limit. In practice, this allows my device to then pull 215W from the PSU (still well under the 240W rated capacity) and avoid battery drain. I created a small script for myself that would automatically detect what PSU was plugged in (since I also have a 180W PSU), and then apply the appropriate override.
I’m not going to provide any links to how to do this on this post, but for those who are interested it is well documented on the Framework forums as the “battery flipping” issue. If there’s enough interest, I may make a future post on the topic for members.
Taping Paper onto my Battery (Fixing Touchpad Self-Click)

This one seems odd, but it’s actually the first mod I made to my Framework and it came out of necessity. I had this issue where my touch pad would click on it’s own anytime it wasn’t on my desk. Having a laptop randomly click while… on your lap, is incredibly frustrating. As it turns out, this was a mechanical issue where a twisting motion of the device was somehow enough to get the button to physically click. After some experimentation, I found that if I taped some paper directly under the silicon spacers of the touch pad module, the issue went away! I later moved those spacers to under the midplate/onto the battery, as this was more convenient considering how often I take the touch pad module off.
More details on my thread here (RandomRanger is my old FW Forums account): [Issue] Palm-rest Clicks Trackpad
Misc. Mods
Bent Spacer
Like many others who’ve ordered the Framework 16, one of my aluminum spacers was bent at an aesthetically unpleasing angle. I just bent it back into place and it’s looked flush ever since. People seem to get worked up over this issue, and I really don’t see the problem given how simple the fix is, but I do sympathize for people spending as much money as one of these machines costs and feeling a need to “fix it” right away.
Upgrades
When I originally ordered my Framework 16, I didn’t actually get the dGPU with it. A year later, I ended up deciding I wanted one and was able to add it to the laptop in under 2 minutes. The dream of upgradable laptops is real!
After release, Framework came out with a Gen 2 camera + mic module. I don’t ever use the camera, but the mic on the Gen 1 was entirely useless. I eventually upgraded to the Gen 2 module and found that the new mic… was still useless. Turns out, all I had to do was change the input volume on my OS settings to ~40-50% instead of 100% and the mic sounded fine! That was probably the problem with the Gen 1 mic too, but oh well. Now it works.
Headset Dongle

Most of the time when I’m gaming, I’ll use my pair of Audeze Maxwells, a wireless headset (not sponsored). As it turns out, the dongle for that headset fits almost perfectly in the expansion card slot! This makes it incredibly easy to game on the couch with the laptop on my lap without needing to worry about putting too much pressure on the dongle.
dGPU Plugs
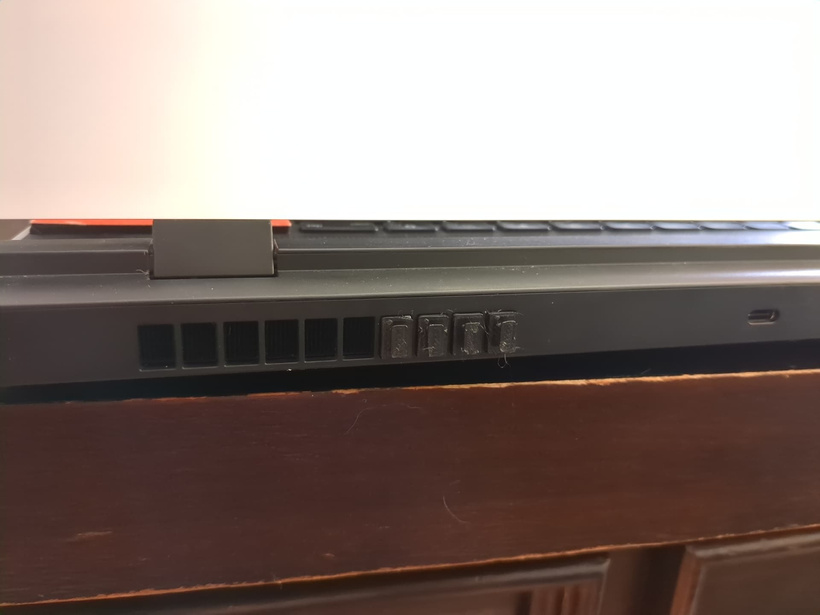
One of the downsides of the dGPU and CPU sharing a fan despite not sharing a heatsink is that the airflow is shared between them regardless of what temperature they’re at. With the way the airflow is configured, most of the air goes to the dGPU (which makes sense, given it can pull twice the power). What is also means, is that if you have a CPU-only load or if you CPU is getting hot and the dGPU is not, most of the airflow is going to the dGPU when it’s not needed. To combat this, I designed and printed a little plug (don’t say it) that fits into the slots on the back of the laptop. This helps prioritize airflow to the CPU at the cost of dGPU cooling. On my forum thread linked below, I have provided the 3D models for free in case anyone else was interested in trying them out.
Note that since the copper shim and air-vent mods I haven’t needed to use these.
More information available on my forums thread here: Blocking GPU fans to increase CPU airflow
The End
Thanks for reading! I hope you found some of this information useful!


